Front Porch Ledger FlashingWorks for Decks as WellLedger flashing installation is critical in building a front porch or deck. It protects the ledger from prematurely rotting away which in turn protects you and your family.Ledger failure is a major cause of porch and deck collapses every year. Whether you do it yourself or have a contractor build it, knowing how to install flashing the right way can save you money and give you peace of mind. Anatomy of Ledger Flashing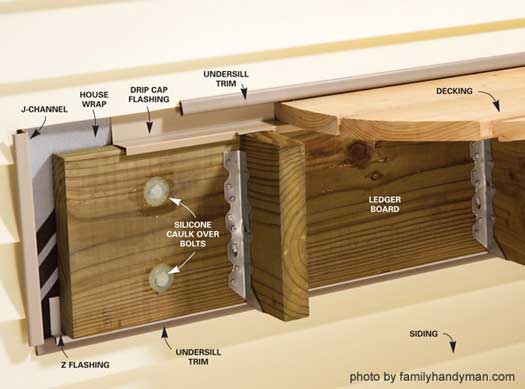
Flashing Installed Over Ledger BoardMost porch or deck ledgers are installed over siding or brick. Although the goal is the same the process is different for each.Here's the basic steps involved for installing flashing on vinyl along with a few good tips to consider and are offered as information only.
NOTE: Always consult with your local building codes department before installing a ledger board to your home.
You will normally have to comply with specific requirements for board size, the spacing of bolts or lag screws, and any other special requirements.
Never attach a ledger board directly over siding of any kind.
Watch This - Ledger Flashing - SidingStep 1Mark the location of the ledger against the siding. Cut the siding at these lines.Secure the bottom cut first. You can install J-channel or other under sill trim using aluminum nails. Gently pull the siding back to gain access for the nails. NOTE: Don't use galvanized flashing with ACQ treated lumber as it can corrode. Step 2Slide Z-flashing up under the siding and secure with nails. Extend it past the cutout on both sides. If you need more than on piece of flashing, overlap the joints by four inches and use silicone caulk to make seals between the flashing pieces.You may have to remove nails from the siding to allow access for the z-flashing. TIP: To make this really water tight, use a wide piece of ice and water barrier (called bitchathane) behind both the ledger board and up under the siding. If you have a house wrap make sure the bichathane is behind it also. 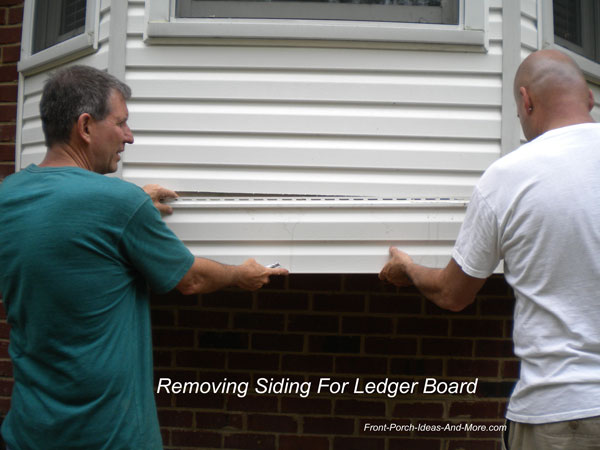
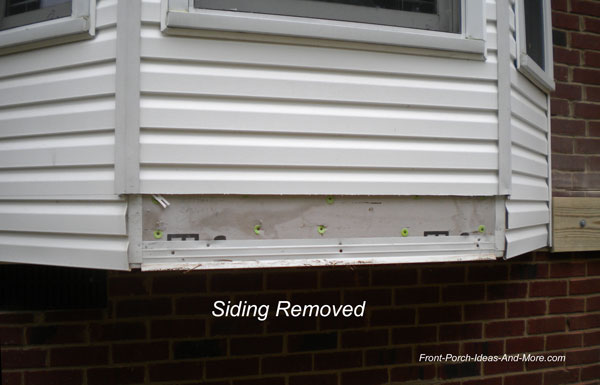
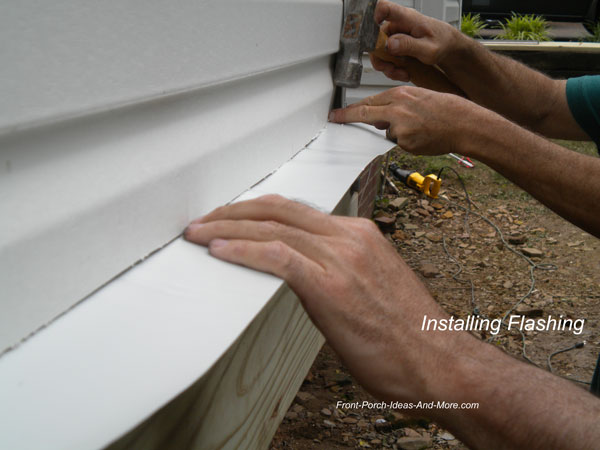
Step 3Install J-channel along the sides of the opening.Step 4Install the ledger with bolts or lag screws (according to your local building codes). Thru bolts are recommended to ensure the ledger is securely fastened to your house. If using lag screws, make sure they extend about 2 inches past the house's rim board.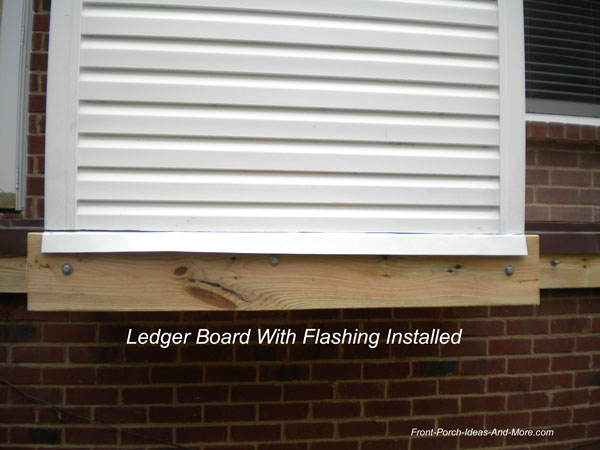
TIP: Before installing the ledger board position two washers on the bolts or lag screws between the ledger board and the wall. This allows just enough space for air to circulate behind the board and for water or moisture to escape. Pre-drill holes and use silicone caulk to form a seal whether using bolts or lag screws. Lag screws are normally required between each joist - check with your local building codes. See our ledger board installation details in our porch foundation section. Ledger Flashing - BrickSee our information about brick flashing. The process is basically the same but there is an added important step.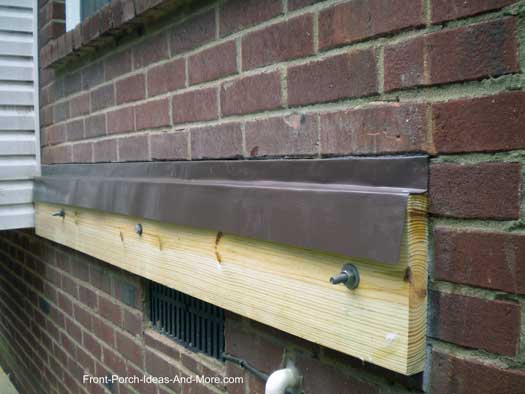
Flashing installed over ledger board on brick

Hi! We're Mary and Dave, lifelong DIYers, high school sweethearts, and we both love porches. You've come to the right place for thousands of porch ideas. Our Sponsors


End Sponsors Helpful LinksEnjoy shopping Amazon (affiliate link)Popular PagesWhat's NewJoin Our Newsletter Family Porch Designs Porch Ideas for Mobile Homes Build a Porch | Small Porches Porch Columns | Porch Railings Screened Porches Porch Curtains | Porch Enclosures Porch Landscaping | Vinyl Lattice Porch Decorating | Porch Ideas Shop Navigation AidsHome | Top of PageSite Search | Site Map Contact Us PoliciesDisclosure Policy | Privacy PolicyLegal Info Please Join Us Here Also
Find a Trusted Local Pro Copyright© 2008-2025 Front-Porch-Ideas-and-More.com All rights reserved. No content or photos may be reused or reproduced in any way without our express written permission. At no extra cost to you, we earn a commission by referring you to some products on merchant sites. See our disclosure policy. We, Front Porch Ideas and More, confirm, as stated on our privacy policy, that we do not sell personal information. All content here is solely for presenting ideas. We recommend consulting with a licensed, experienced contractor before you begin your project. We make no guarantees of accuracy or completeness of information on our site or any links to other websites contained here. Thank you for taking your time to stop by. See what's popular and new here. |

Hi! We're Mary and Dave, lifelong DIYers, high school sweethearts, and we both love porches. You've come to the right place for thousands of porch ideas. --- Cute Mushroom Mug ---
Wouldn't this be an adorable mug for your porch? It's for sale in my Etsy shop! --- Our Wonderful Sponsors ---


--- End Sponsors ---Our Newsletter, Front Porch AppealLearn more!Thank you for being here! |
|||||
|
At no extra cost to you, we earn a commission by referring you to some products on merchant sites. See our disclosure policy.
We, Front Porch Ideas and More, confirm, as stated on our privacy policy, that we do not sell personal information. All content here is solely for presenting ideas. We recommend consulting with a licensed, experienced contractor before you begin your project. We make no guarantees of accuracy or completeness of information on our site or any links to other websites contained here. Front Porch Home | Return to Top Contact Us | About Us | Advertise with Us | Search | Site Map Media | Privacy Policy | Disclosure | Legal Notice | What's New |
||||||
|
No content or photos may be reproduced or copied in any way without our express written permission. | ||||||
